|
If you cannot see the links
or images in this newsletter,
click here to read it
from our Web site or copy and past this URL into your Web browser:
http://www.seattleavionics.com/newsletters Dear Voyager User, Well, it's July and you can almost smell the 100LL in the air as many of us prepare for the "World's Greatest Aviation Celebration" in Oshkosh next week. With so many of us taking to the sky, I thought I'd start a two-part series of planning and flying from Seattle to OSH. We'll discuss the planning in part one this month and focus on the in-flight aspects next month — after we actually take the flight. But first things first. Last month, I mentioned that I, rather than our usual mouse-master, John Rutter, was doing the webinar about new Voyager 3.6. I also mentioned that John and I had a bet about whether or not this webinar would have a record number of attendees. A very, very nice bottle of wine was on the line. Thanks to many of you, I won the bet handily. Cheers! In case you missed it, you can see the recorded version at http://www.seattleavionics.com/webinar.shtml Also, some of you may have tried to download Voyager in the past and had a problem. You can immediately download a trial version of the full Voyager system from: http://www.seattleavionics.com/DownloadURLs.shtml or 100% free Voyager FreeFlight from: http://www.seattleavionics.com/DownloadURLsFF.shtml Flight Log is a recurring newsletter for all Voyager users, with the latest Voyager news, tips and tricks. I'm very interested in your feedback, either to the newsletter or to Voyager itself. Please send any comments or suggestions to me directly at SteveP@SeattleAvionics.com. Back issues of Flight Log are available from our Web site at http://www.seattleavionics.com/Newsletters
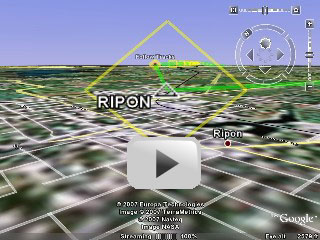
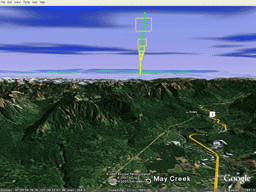
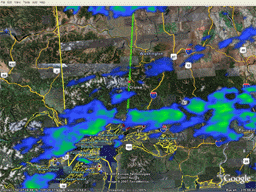
Every month I keep saying, "normally there is just one picture, but for (insert good reason here) we need two this month." Ok, I give up; there will be two or more pictures each issue from now on. The first image this month is a Google Earth virtual flight made with Voyager that shows the FISKE VFR arrival into OSH. Unfortunately, the Google images of the OSH area aren't as clear as much of the surrounding areas, but you'll certainly get the idea. We tried to get EAA to move the show to Anchorage, which has stunning natural beauty and great Google images, but oddly, they didn't agree. Click to play the OSH approach video. And if you're flying to OSH, be sure to read the actual NOTAM.
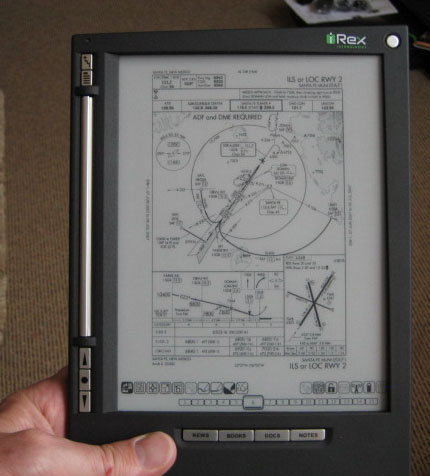
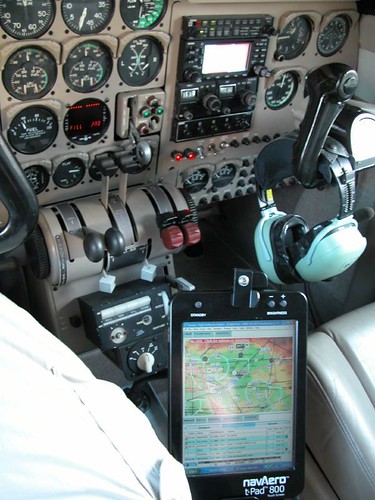
This photo is from a customer, Ron Krohn, who used Voyager's Print to PDF feature to put his flight plan, charts, approach plates, etc. on something called an iRex iLiad. The iLiad is very innovative solid-state device that has the daylight readability of a piece of paper, a screen about the actual size of an approach plate, and a battery life measured in days. For $700. Come by our booth (Building B, #1129-1130) and have a look. It's pretty amazing.
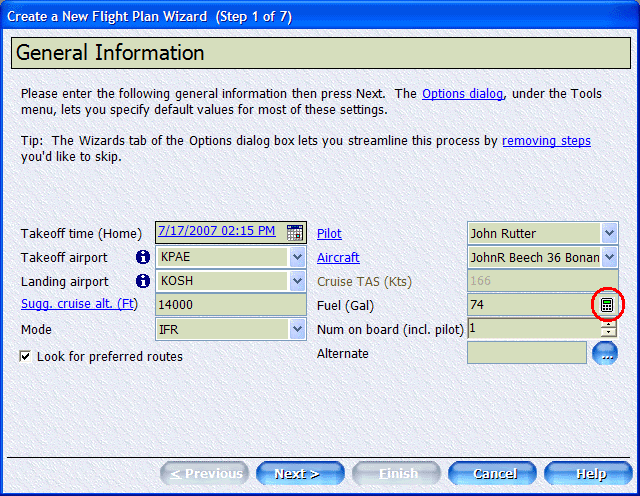
As I said, this month I'm not going to talk about Voyager's features per se, except how they relate to planning a flight to OSH. So let's talk about how I did the planning this year with Voyager 3.6. Weight vs. Fuel Seattle Avionics sends lots of people to OSH. As always, we prefer to fly ourselves, but we don't have a corporate PC-12 so we end up taking an armada of smaller planes. Although we don't camp out (we find we sell better when we've had hot showers), we have to take a considerable amount of booth equipment — banners, tables, computers, etc. — so weight and space are serious considerations. This year, we have both IFR and VFR pilots planning trips, but for the sake of making this narrative a little shorter, I'll focus on a trip flown in a Beech Bonanza A36 with John Rutter, an IFR pilot with a lot of hard IFR time. One of our first tasks is to figure out how much weight we need to carry in the A36, and therefore how much fuel we can take. Having done this for several years now, we know that every ounce is precious because avoiding an extra fuel stop can make the difference between a fun but exhausting single day of flying and a two day mini-odyssey. This is doubly true on the way back from OSH when the winds tend to be against us and everyone wants to see their families again. In Voyager 3.6, we added a subtle but very useful feature that makes this calculation a snap. It's called the Fuel vs. Payload Calculator and you can access it during the Flight Planning Wizard by clicking a small calculator icon as shown below.
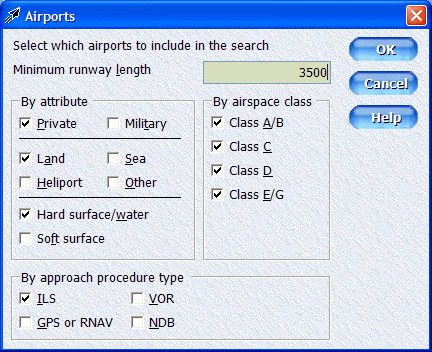
It works by letting you enter either a fuel volume (or weight for jets) or a payload, and Voyager calculates the corresponding figure on the other dimension. So given that we need to carry 815 pounds of cargo and people, we are limited to just 50 gallons of fuel. That gives us a ballpark flying time of four hours with no reserve. Fuel Follies This is where Voyager really shined, although it took me a while to figure it out. Trying to be conservative, I used Voyager's SmartRouter in GPS Direct mode with more-or-less default options, except that I wanted to make sure that all fuel stops had an ILS approach, and given our less than svelte takeoff weight, at least 3,500 foot runways.
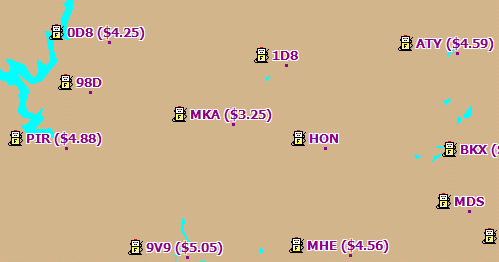
Voyager selected SZT, DIK and ISW as fuel stops. Checking these, it seemed like the fuel prices were a little steep ($4.58 at DIK, for example) and we probably could do with one fewer stop. So, cursing the programmers a little, I clicked the large Fuel Prices button on the main toolbar to change to a theme that basically just shows fuel prices, a very handy feature. Then I used the Hand tool to move the Chart around, zoom in, zoom out, etc. until I thought I had found better choices by stopping at HLN ($3.85) and MKA ($3.25) instead. This wasn't hard, but it did involve moving the Chart a lot, expanding and contracting the NavLog to ensure that we didn't run low on fuel during any leg, and I had to click on each airport to ensure IFR approaches and the required runway length. This process took about 20 minutes, but when it was done I thought I made some good choices and was proud that I was able to beat the computer. And 20 minutes work for nine hours of flying didn't seem too bad.
Then I looked at MKA again and I realized that it didn't have an ILS, just a GPS approach. Therefore, given the criteria I fed the autorouter, it couldn't have picked MKA. I decided to play fair and run the autorouter again with a criteria that allowed landing with just a GPS approach. Guess what route Voyager picked this time? Stops at just HLN and MKA — exactly the same as my hand-optimized route. And Voyager picked to fly a little lower on two of the legs than the altitudes I selected, resulting in both less time and less fuel burn. So, final score: Voyager - 45 seconds; Steve - 20 minutes. Machine beats man in a landslide. But man saved about $150 in fuel by using the computer, so it's hard to complain. Quick word from our sponsor: You only see fuel prices if you have a current ChartData subscription. If you've let yours lapse, you're in luck as we're starting our OSH specials a little early. Get 15 months of updates for the usual 12 month price by clicking to: https://www.seattleavionics.com/eCommerce/buy.aspx and using Coupon Code CD36. OSH NOTAM & Virtual Flight Flying into OSH during AirVenture isn't like flying into your local airport, so like thousands of other pilots, I downloaded the official NOTAM for the arrival. In addition, I also used Voyager 3.6's new Google Earth export feature to add the Oshkosh FISKE VFR Arrival to our plan and do a virtual flight. Not only is this cool to the computer geek in me, but the pilot in me felt much safer having virtually flown the procedures into HLN and MKA, neither of which I've flown to before (you find a lot of new favorite airports when you start looking at fuel prices).
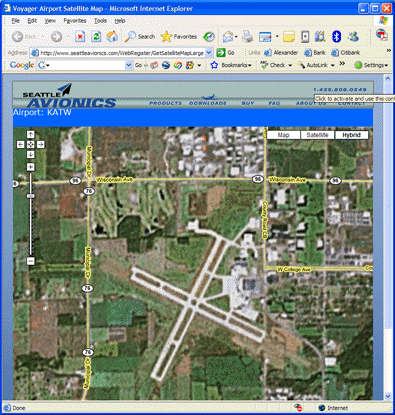
I also wanted the Google Map image of our landing airports and Appleton (ATW) just in case. To do that, I right-clicked on our landing airports, selected Show Info and used the Full Screen option to show the Google Map image in my Web browser. When I got the zoom right, I just hit Print on the Web browser.
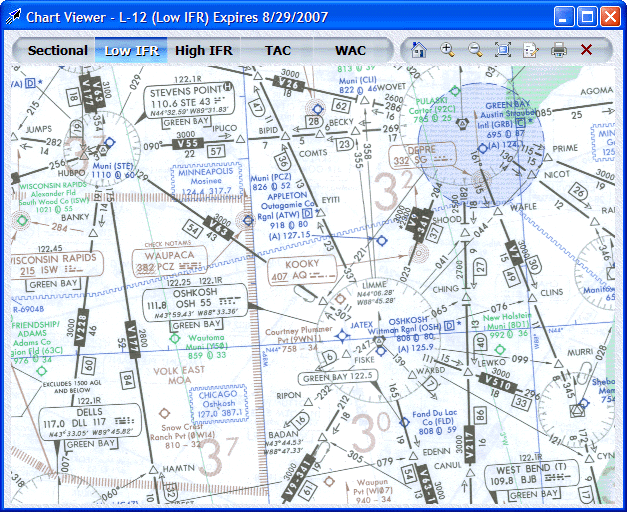
Approach Plates and Charts I could have created a Plate Pack and collected all the plates for airports in the area, but in this age of high-speed Internet connections, I found it easier to download all US approach plates. Do that by selecting Update Procedures from the Tools menu, then choosing the Download All Procedures option. The file is about 700 MB so it takes some time but it makes life easier when you know that you have all the current plates with you. To be fair, I did print a few by creating a simple Plate Pack (about 25 plates from airports along the way). It's John Rutter's plane and he's likely to be the one shooting the approaches. Since his eyesight is good I used the Kneeboard sized option (two plates per page) for printing. If you prefer, you can also print them larger than the originals by using the Full Page option. I also used the new Download Manager in Voyager to collect all the Sectionals and IFR Low Altitude charts we'd need for the trip and download them in the background while I continued to look at the flight plan. Later I printed relevant parts of the L-9, L-10, and L-12 charts.
FBO Info There is a good chance that we'll have to divert and land at an airport off the flight plan. In keeping, I wanted information about all the airports near our route so we'd know which FBO had the lower prices (or nicer loaner cars) and how far the restaurants and motels were. Of course, you can't get on the Internet while in the air so you have to download this before the flight. Voyager makes it easy, though. With the flight plan open, I selected Download Airport Information from the Plan menu. I chose the option for All airports near the route, made the radius 50 NM and unchecked all the boxes except FBO and service information (we already had the plates, we just needed the AOPA directory info). This downloaded info for 282 airports in about 15 minutes over my home DSL. At this point, I was happy that we had everything we needed for the trip. ....Continued next month with Part 2: The Flight.
It's fair to say that of all the features that went into Voyager 3.6, none have been as talked-about as the Google Earth support. I should not have been surprised, therefore, when John Darden emailed me about a Web site called GUIWeather (http://www.guiWeather.com) that provides free weather layers for Google Earth. See the image above. The one on the left shows clouds overhead during a 3D flight while the one on the right is looking straight down on the same location. About actually flying with Google: Let's go over the basics. Getting Google Earth It's a free download from Google. See http://earth.google.com Exporting a flight plan to Google Earth Start Voyager and open or create a flight plan. Select Send to Device or Application (or Send to Google Earth or Application if using FreeFlight) from the File menu. Google should start right up and zoom to a 2D overview of your flight plan. Navigating in 3D
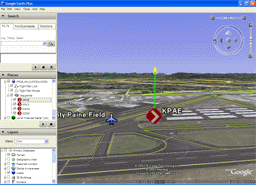
You can control Google Earth using the on-screen control pad, your keyboard, or even a joystick. I've found the virtual joystick at the middle of the controller (the star-shaped image above) the easiest way, so that's what I'll describe. If you want to try your hand at using a real joystick or take a look at the other options, select Options from the Tools menu (in Google Earth, not Voyager) and choose the Navigation tab. The normal system is called Pan and Zoom. You can also try a mode Google calls Flight Control. I don't know what plane Larry and Sergey fly, but it doesn't fly anything like a C172, or so it seems to me. If you want to use your joystick, plug it in and select check the box labeled Enable Controller. As I said, I find the onscreen controller above the easiest way to fly it, but it's tricky and I'd love to hear from those of you who know it better than I. The slider control on the right controls zoom, and the one on the top controls how 3D or 2D the effect is. When the top slider is set all the way to the left (the straight-up X), you're looking straight down from space. When the top slider is set to the far right (the slanted X), you're looking horizontally to the world, as if flying. Problem is, each slider affects the other, so zooming to where you want with the angle of attack you want is like individually cutting the legs off a table to get the right height. Click and drag the ring with the N (true North, btw) to rotate the view. Click and drag the center dot (think of it as a virtual joystick) to pan in any direction. Also notice the Places area above. In Google Earth, it's on the left side of the screen. You may have to click little + icons a few times to expand the tree as above so you can see all the waypoints of your flight plan. The checkboxes next to each item (Flight Plan Line, Flight Plan Boxes and each waypoint), let you turn each of these on or off individually. For example, if you don't want to see the Highway In The Sky (HITS) boxes, uncheck the Flight Plan Boxes item. Here's what I do to start at a certain point and then begin flying: Double-click the waypoint at which you want to begin, such as KPAE above. This makes Google Earth zoom to that point looking straight down. Rotate the ring such that the green flight plan line is headed straight up to the next waypoint.
Use the zoom slider (the one on the right) to zoom in ABOVE the point you want (take a look at the "Eye alt" indicator on the bottom of the Google Earth screen) then use the top "attack" slider to go horizontal. Flattening the angle of attack also seems to have the side effect of alternating the effective zoom range (or eye alt in Googlespeak), so if you initially over-zoom you may find yourself subterranean.
Then begin flying through the boxes using the virtual joystick at the center of the Google controller. Push it straight up to move forward. Good luck. Making Movies Taking virtual flights with Google Earth can be addictive and you may want to record them so others can watch. While the Pro version of Google Earth does offer this feature for $400 per year, you can get the job done using a shareware utility called Fraps. You can download a free version that limits movies to 30 seconds and puts a "www.fraps.com" marker on every video or buy the full version for $37 with no such limitations. Be sure to read the FAQ (frequently asked questions) about video capture as it may not be obvious how the system works. Download Fraps from http://www.fraps.com Also, raw captured movies tend to be very large. If you plan to post them to a Web site or email them to someone, we suggest using the free Windows Movie Maker that comes with Windows XP and Vista to compress them. While certainly not the best video editor on the market, it is easy to use, free, and turns the raw .avi video files generated by Fraps into much smaller .wmv files that can be posted to Web sites for streaming download (that is, the video begins to play before the whole file is downloaded). Take a great virtual flight? Send me the URL to where you've posted the video and it might find its way into the next newsletter. Please do not send actual video files via email as they are usually very large. Back in the real world, we get a lot of questions about how best to use Voyager's GlassView in the cockpit. Of course we fly with our own products, but it's always nice to get an unbiased point of view. In keeping, you may want to read Alan Kucheck's very interesting blog on installing and using a system in his Aero Commander. As you'll see, Alan is not your typical guy; he's not even your typical pilot. For example, rather than just using an off-the-shelf tablet PC, his solution involves a powerful laptop modified with solid-state drives mated to a navAero tPad for display. http://blog.kucheck.net/2007/07/10/11d-gets-weather-in-the-cockpit/
Alan quipped that I should read the blog if I had trouble sleeping at night. Actually, it had the opposite effect; I read it late one night and couldn't fall asleep for some time because I kept thinking of the blog. For example, after reading some of his other blog entries, I have to wonder when he'll add solar panels to his wings and replace the piston engine with an electric motor. That's how to beat the high cost of 100LL!
It's tradeshow time again and that means many things, most notably tradeshow pricing. If you can't make it to Oshkosh this year, we thought you still might like some of the same specials, so here goes. We had the high cost of AvGas in mind this year, so made ChartData subscriptions (which include fuel prices) central to each special. We think you'll see quickly how the system saves you money on every flight. For existing customers who have let their ChartData subscriptions expire, we're offering 15 months of ChartData for the usual 12 month price. That means just $99 for 15 months of VFR ChartData renewal (fuel prices, scanned Sectionals, new versions of Voyager, etc.) and similar savings for IFR and EFB ChartData subscriptions. Go to https://www.seattleavionics.com/eCommerce/buy.aspx and use Coupon Code CD36. For first-time customers only: $99. SmartPlan Express + 6 months of VFR ChartData (including fuel prices, scanned Sectionals, etc.). Normally $148. $149. SmartPlates Express IFR Procedure Management System + 6 months of IFR ChartData (adds scanned IFR High and Low Charts plus WACs). Normally $347. $199. SmartPlan Premier + 6 months of IFR ChartData. Normally $347. Go to https://www.seattleavionics.com/eCommerce/buy.aspx and use Coupon Code Fuel99. This is normally the part where I describe useful tips for using Voyager. However, if you think about it, the rest of this newsletter was pretty much one large Tips and Tricks section. Therefore, I'm going to skip the section this month but promise to return to it next month. As always, please send your questions and favorite tips to SteveP@SeattleAvionics.com. You'll notice that much of the material from this newsletter was suggested by your fellow pilots. A reminder that past Tips and Tricks are
available from our Web site at Seattle Avionics Software will be showing Voyager and our new Tablet PC devices at the following upcoming events. Stop by to say hello, see the latest Voyager features, and ask the experts any questions you have about Voyager. Maybe even get a preview of Voyager 4.0. July 23-29: EAA AirVenture, Oshkosh, Wisconsin. Booths 1129-1130, Building B. September 25-27: NBAA 2007, Atlanta, Georgia. October 4-6: AOPA Expo, Hartford, Connecticut. Until next time, happy flying and may all your fuel be cheap.
- Steve Podradchik, CEO (and Editor)
|